Have you ever wanted an overview of how your organization is performing with 10to8 appointment...
How to Navigate the Updated 10to8 Calendar View
If your calendar isn’t the core of your 10to8 account, you’re probably missing out! That sounds like a bold statement doesn’t it? And, you’re right – it is. 10to8 has plenty of powerful features and the calendar is just one of many. But there’s a lot more to the updated 10to8 calendar than simply keeping track of your day-to-day activities.
If you're like most people, you probably have a lot to keep track of - appointments, deadlines, meetings, social events, and more. And like most with a busy schedule, you probably also value organization, efficiency, and productivity. That’s where the calendar view comes in.
In this article, we'll explore the benefits of the recent changes to the 10to8 calendar view and how it can help you manage your time even more efficiently. Let's dive in!
Table of Contents:
How to view your 10o8 calendar
Searching for slots in your calendar
How to view your 10to8 calendar
You can find the calendar in the menu on the left-hand side of your 10to8 account. This will show you an overview of your days and weeks, the hours you are working, and any appointments that you have. You’ll also be able to see busy periods and time blocked out by another external calendar.
Depending on your account permissions, you may also be able to see the calendars of other staff members from this page. You can view your appointments and free slots together with those of your staff members. This allows you to easily see how busy your business is, as well as quickly book an internal meeting when other people in your organization are available.
Set up your availability
Your availability will let others know when you are working. You can set up availability independently for external appointments and internal meetings.
The appearance of your 10to8 calendar is also dependent on your working hours and availability. You can easily set this up by going to ‘Set Up > Availability’ on the left-hand side menu. From here, you can change and edit your working hours.

Any available hours will appear in your calendar as white blocks. These can be booked by yourself or other staff members. Any time that you’re non-bookable will appear blank.
You can also toggle this via a shortcut in the diary. From your calendar screen, head to the top right-hand corner, and you’ll find a button with three little bars. Clicking on this will bring up the calendar settings. Select the ‘Working Hours’ button and you can quickly change your hours as and when you need to.
Syncing your calendar
Syncing your calendar allows 10to8 to be the central location for all of your appointments - even if they weren’t booked via the platform.
Your 10to8 calendar might not be the only place where people can book you. If you have a personal calendar (like Google Calendar, or iCal), it’s important to ensure that meetings in that calendar aren’t missed. But, don’t worry - there’s an easy fix.
Head to ‘Integrations > Calendar Sync’ in the left-hand menu. From here, you’ll be able to sync to a Google, Office 365, iCal, Microsoft Exchange, or Outlook calendar.
Simply select the calendar you’d like to connect to, follow the steps, and voila! Your external appointments will also appear in 10to8. This will make it much easier to manage multiple diaries and see all of your appointments in one place.
If you’re having trouble with syncing your calendar to 10to8, check out our troubleshooting guide.
Calendar views and features
So, once you’ve set up the basics of your 10to8 calendar, it’s time to look at some of the extras you can do with it. There are lots of different ways you can view your calendar and things you can do with it. But let’s start by exploring the different calendar views.
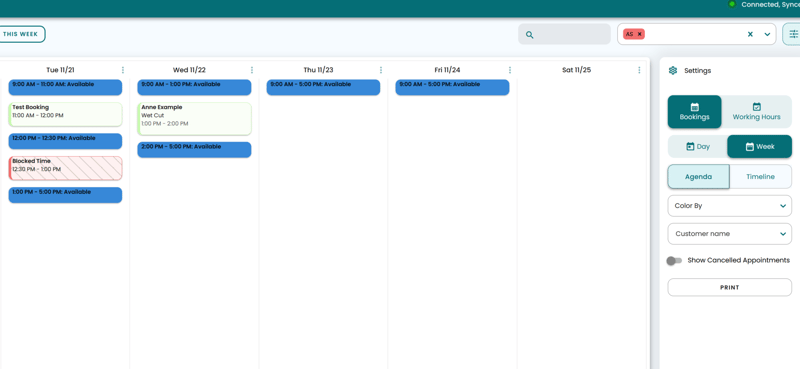
To see these, we once again have to go to the three little bars on the top right-hand side of the calendar. If you click on the top ‘Bookings’ button, you’ll see a range of options underneath, including the ability to view your calendar by ‘Agenda’ or ‘Timeline’.
Agenda and Timeline views
Based on the workflow of your business, you can decide how to view your calendar. These two options give you different ways of viewing your appointments.
The Agenda view will show your entire day as a snapshot. It will summarize any available slots into one block and any bookings into another. For instance, if you have a booking from 9am-10am and then are free for the rest of the day, you’ll see the first booking as one block and your available time as a separate block.
The Timeline view will show the entire day. This has more of a calendar feel than a snapshot as it displays your day as a calendar and your bookings blocked out in sections.
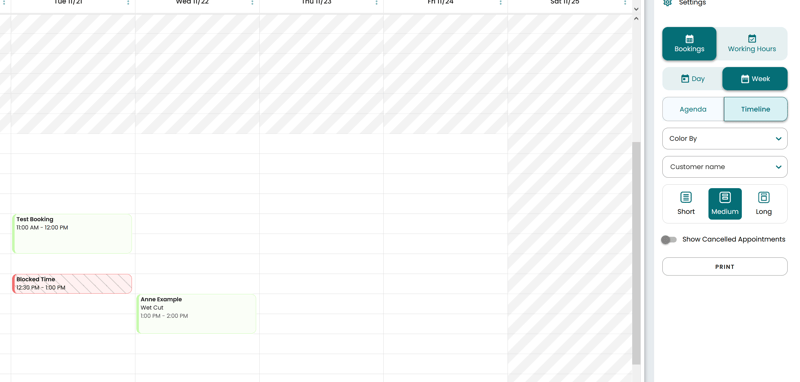
With this view, you can also adjust the size of your calendar to either small, medium, or large. If you want to view the calendar quickly, the small view would suit you best. Whereas if you have quite a crowded calendar and want to view each hour in-depth, the large view might be preferable.
Both of these views give you the ability to toggle canceled appointments to show, and print the calendar.
Color-coding bookings
Color-coding your bookings will make it easier to find things quickly. Whether you have a customer waiting or simply don’t want to spend lots of time scrolling through a busy calendar, this feature can be incredibly useful.
You’ll find this option underneath the Agenda and Timeline view buttons as a drop-down menu.
You can color code your bookings by:
- Service Type - You have the option to assign a color to each of your services on the service page. This option will use the colors you define to organize your bookings.
- Location - Online appointments will show up in a different color to appointments at the premises. All bookings at the same location will be the same color.
- Staff - This uses the staff member on the booking. You will be able to see how many appointments one staff member is taking compared to another.
- Room - All bookings made to a certain room will be one color.
- Arrived and No-shows - You’ll easily see which appointments are no-shows as they’ll appear in a different color.
- Internal or External - Bookings made within your organization will be one color and those made outside of your organization will be another.
This feature provides a clear overview of what types of appointments you have, what status appointments are in, and where your appointments are held. Very handy if you need an at-a-glance view of your day, someone else's day, or appointment no-shows for the day or week.
Naming Bookings
Naming your appointments will allow you to see at a glance the part of the booking that’s most important to you.
The final dropdown in this section allows you to choose how to name your appointments. This can vary depending on how you, or your organization, likes to organize each day.
You can name your appointments by:
- Customer name
- Service name
- Time
- Location
What you choose will dictate how your bookings appear in the calendar. For instance, let’s say you work in a large financial institution and you have a mortgage appointment booked with Jessica from 1pm - 2pm.
If you select the customer name, Jessica’s name will appear first on the booking. If you select the service name, the service, in this case, ‘mortgage appointment’ will appear first.
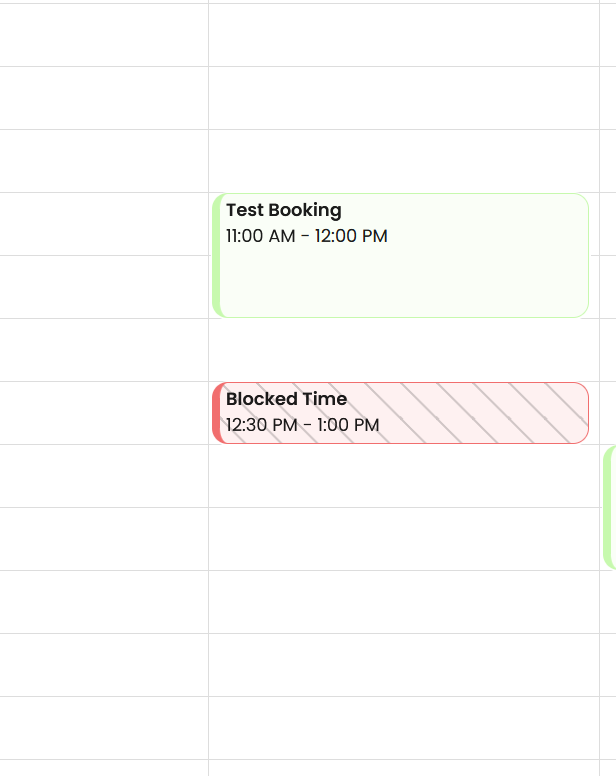
Selecting the time option will mean 1pm - 2pm will be the first thing you see.
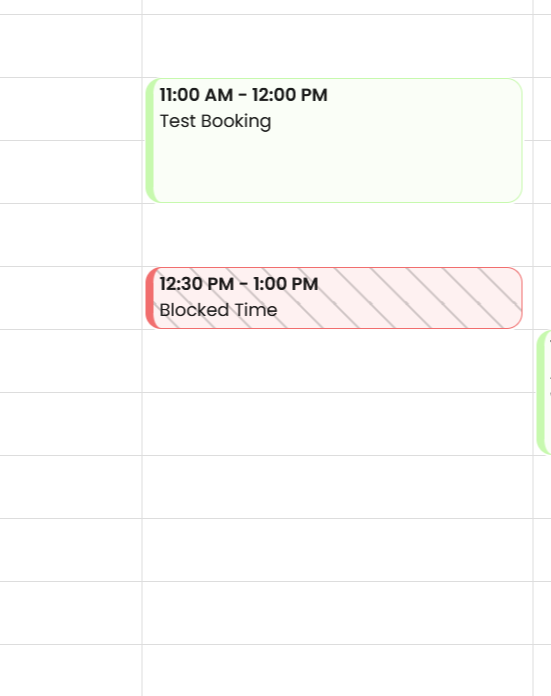
The final opinion, location, will tell you where each booking is held first. For instance, if you have a virtual consultation, you will be able to easily distinguish this from your at-branch appointments.
With each of these options, you can still view the rest of the booking information. This dropdown simply prioritizes what information your bookings display first, allowing you to organize your calendar based on what’s important to you.
Calendar and date buttons
These buttons allow you to easily and quickly navigate between the days, weeks, and months.
Let’s move to the left-hand side of the calendar. At the top, you’ll be able to see the date you have selected, and a couple of buttons next to them - ‘Today’ and ‘This Week’.
Clicking on the dates will load up a date calendar dropdown for the entire month. From here, you can click on a certain date and flick easily between months.
The buttons next to it allow you to easily move back to the present. ‘Today’ will take you to today’s bookings, and ‘This Week’ will show you all bookings for the current week.
Searching for slots in your calendar
This search bar allows you to quickly look for a specific booking without having to search through your calendar.
One of the biggest feature releases in 2022 was the ability to search for slots in your calendar. Type a word (perhaps a customer or booking name) into the search bar in the top left and 10to8 will search your calendar to find a matching booking.
You’ll find bookings in seconds instead of having to comb through days worth of appointments. This feature is priceless for a busy calendar and can shave precious time off managing your diary.
Staff selection
You can use this feature if you need to look at more than one staff member’s calendar at once.
Using the search box on the far right-hand side of the calendar view, you can pick which staff members’ calendars you would like to view.
Look at the image above. You can add as many staff members to the view as you’d like. You can also filter by teams within the business (marketing team or sales team for example), to see when everyone is free. This is ideal for booking group training, or perhaps, you need two sales people for an event and need to quickly see who is free and when.
To clear your selection, hit the cross in the search box. And to return to viewing just your own calendar, there’s a little ‘Me’ button in the dropdown. Handy, right?
The bottom of the calendar
The two features at the bottom of your 10to8 calendar allow you to adjust the view of your calendar so you can see things better, and search for customer details.
The final element of navigating the new 10to8 calendar view is the very bottom of the calendar. Here, you’ll find another search bar and a scale.
The scale is pretty simple. It allows you to zoom in and out of your calendar view. Just click the plus or minus buttons to set your preference for viewing your calendar. This search bar allows you to search for customer details.
This is different from searching for customer bookings. Let’s use Jessica from our financial organization as another example.
If you were searching for upcoming bookings with Jessica, you’d use the search bar at the top of the calendar. However, if you wanted to know Jessica’s information, perhaps to send her an email, or edit her customer details, you’d use the bottom search bar.
Typing her name into this search bar will bring up a window on the right-hand side of your calendar showing every customer named Jessica on your account. Add more information to narrow it down further, and you’ll be able to find the customer you’re looking for.
Once you click them, it will take you out of the calendar view and to their customer profile in your account. Then, you can edit their details, book them for an appointment, view all appointment history, or send them a private booking invite.
Making a booking
Last but not least, let’s talk through how to create a booking in the 10to8 calendar. You’ll need this when you want to book a customer in for an appointment or arrange a meeting with another staff member.
There are several ways to do this. You can simply click on a time slot, and the ‘Make a booking’ panel will open. From here, you can pick a service, pick a customer, and configure every aspect of your booking.
The other way to do this would be to hover over the circular button in the bottom right-hand corner. This will bring up three options; make a new booking, block time in your calendar, and toggle your availability.
The availability option is another way to edit your working hours. This will take you away from the calendar page to the availability section of your 10to8 account.
Clicking on the new booking button will bring up the same ‘Make a booking’ panel, and you can configure a new booking. The ‘blocked time’ button will allow you to block out time in your diary so others cannot book you. This works in a similar process to booking a new appointment - you will be able to change the details in the panel to your right and book it once you are happy.
Overall…
So, let’s recap what I said at the start - the calendar should be the core of your 10to8 account.
You can edit your working hours, search for specific slots, view not just yours but your team members' calendars, color-code your appointments, select multiple different ways to view your calendar, and much more with this feature. It can help prevent double bookings, help you analyze your no-shows, and makes scheduling meetings with multiple staff members easier.
Whether you are a solo practitioner or part of a larger team, the new 10to8 calendar view can help you to streamline your scheduling process and stay on top of your appointments.
Click the button below to check out the calendar.
If you’d like to see the calendar in action or have any questions about this feature, reach out to one of our scheduling specialists today.




Blog comments